
Wednesday, September 30, 2009
Tuesday, September 29, 2009
N-Block: Contemporary Cakes and Desserts
A new class, yet again! I have never truly enjoyed the first-day-of-school jitters. Seems like I get to experience them every three weeks here at this school! Only 'cause it's that intense! In college, the first day was a guaranteed snoozer = go over the syllabus, maybe get an assignment, go home early!
Here we are expected to be well well well prepared. This new class is no different, and I suspect that it will get increasingly harder as we make our way back down the hall throughout the bakeshops.
Chef W is French. Our first French chef so far. We have had several Germans, Americans, and a Swiss instructor. Everyone has had a hard time pronouncing my name, but instead of annoying me, I find it amusing and look forward to the next butchering of my given name. Chef W is French, but for some reason still couldn't pronounce my French-style name! Haha!
So far, he seems extremely nice, but wants to push us and make us better. This is a production class. All the desserts we make will go down to the common eating area for the other students (fondly referred to as Club Farq by some of us). We will be expected to have things finished by 10:45 am every day, so it is really a collective effort instead of individual. When we finish things within our team, we are expected to offer help to other teams. The products I made today (coconut dacquoise and chocolate flourless - both short, flat cakes in sheetpans) will be used by everyone else later on in the week. In this way, we can maximize our production, although we don't get to learn how to make everything. Too bad, but this class also focuses on taking our skills to the next level, not necessarily learning all new things.
Chef W was pretty serious about being prepared for the class - to the point of sending home two students right off the bat because they didn't have everything with them. They came back once they got their act together, but I'm sure it wasn't a great way for them to start off the class.
We lost a classmate last block (dropped out), and gained three more, so our group stands at 16 now. There are 8 of us who are from the "original" group of 13 we started with. Pretty amazing how many people have filtered in and out due to varying circumstances.
Today was mostly a mise-en-place day. It felt good to do some baking, as I hadn't done ANY since I made a friend's wedding cake back in July! Tomorrow we will begin to build our desserts. The "large" size is called an entremet (on-tre-may) which means "between meals" in French. It's typically served around 4pm. The smaller sizes we will make are called petit gateau (pe-tee gah-toe). Contemporary means we are using new ways to make cakes - using molds, fleximolds, silicone molds, pvc pipes and ring molds to create ways to hold up mousse and make new shapes. Interesting glazes, chocolate decor, and colorful jaconde (decorative thin sponge cakes) will happen in this class. I'm totally familiar with making mousse after the many debacles I had with gelatin in my last class before extern. Woo!!!
On another note, my mom and I had a FABULOUS time this past weekend, celebrating my birthday! It was great to see her of course, and I'm hoping to post some pictures about it here soon. Here's a shot of my lovely *surprise* birthday cake from my best friend! It was delicious!!!


I feel as though we are finally starting to look related, Mom!
My pillow is calling me.... goodnight!
Friday, September 25, 2009
Twenty-Five
Today is my birthday!
I am so blessed to be able to spend it with my mom! I have a random three-day weekend, so Mom came out and we are going to have a great time. I've been a little homesick lately, so it's nice to have a little piece of my family here with me.
Love to you all! I'm so happy to be alive! :)
100th Post! Individual Cake: Pt. 2!
I DID IT! Finished the cake that is... with 10 minutes to spare! Here's some eye candy... I'm really happy with how it turned out given the time I had to work on it.


The class is now complete and I'm kinda sad. I really liked Chef C, the creativity we got to have, and the relaxed atmosphere. I learned so much!
This is also my 100th post... who would have thought I'd have so much to say? :)
Thursday, September 24, 2009
Individual Cake: Pt. 1
Man, today was intense!!! Everything took way longer than I had anticipated!
I got to the bakeshop early to get everything set up and gather all my equipment. Thankfully, my buttercream worked out. I started off trimming all my cakes, slicing them in three layers each and soaking them with some simple syrup. I colored the frosting in varying shades of green, frosted each layer, trimmed the sides, crumb coated 'em and put the final layer on. I wasn't happy with the finished product, but I had to make do!
I thought all that trimming and frosting bizness was only going to take me 1 hour. It took me 1 hr and 45 minutes. !!! I forgot I was doing three cakes, not just one!
I quickly got on making the flowers. I busted out ten plumerias fairly quickly, then moved onto the hibiscus petals. So frustrating! Lunch break. Then I made a sea grape lei with gumpaste and floss (yes, floss!) in about 25 minutes! I had to work fast to finish before the time limit.
Tomorrow is looking like assembly, painting the flowers and decorating! Hopefully I can finish up in 3 hours! I can't believe it is the last day already! Whew!
Work today was AWESOME!!! I am finally on a long-term project! I started it on Tuesday, gathering info for a proposal for a new book. Today, I brought that outline up to the editorial publishing manager and she said "You did this? All this?" YESSSSS!!!! Well, it's not hard when it's baking stuff! So now I am set to work on the project, gathering information and doing research. So cool! It is making me think about baking in a totally different way, especially when trying to inform readers and make it visually pleasing. Then, we had a BROWNIE tasting! Peanut butter swirl! Woot! Then my two supervisors said "We need to have a morale booster. Coloring contest!" Haha - these two girls I work with are so cool - hilarious and funny. It made my day!
Wednesday, September 23, 2009
Team Time: 4-Tier Cake Pt. 2
We did it! Finished the cake! Finished ten minutes early!!! I'm pretty happy with how it turned out. It was A LOT more work than I would have guessed at the beginning. I spent over an hour cutting the circles out and gluing them all on while my partner painted/colored all the roses and leaves. Whew! Here it is. Too bad it can't be eaten!
The example we were to follow:

Our finished product: view 1:

View 2:

close up of the roses:


The final went well and was pretty quick. It was short answer, but I knew it all! Not too shabby :) Off to do some work! Feeling pretty nervous about my individual cake tomorrow. I need to get as much done as possible. We'll see what happens!

Tuesday, September 22, 2009
Team Time: 4-Tier Cake Pt. 1
We had all of class today (7-11am, and 12-1pm) to work on our team project: a wedding cake. Chef C assigned designs to each team according to their styles. As mentioned before, my partner and I got a cool retro-lookin' cake! I'm still stoked on the design and I hope we can execute it well.
Each team got a fresh bucket of white fondant and we were off! My partner and I got to work greasing the fake cake rounds (made of styrofoam) with some Crisco and then colored our fondant a peachy-orange for the base. Since the design is retro, we're going for 1970's colors too: orange, brown and yellow.
Once we'd gotten the color we wanted, we rolled out the fondant and covered each of the four tiers. It was my first time covering a round cake and it was harder than I thought! Fortunately, my partner had experience working with fondant and she was happy to teach me some new tricks. We tag-teamed the larger layers and stacked the cake, gluing each layer together with some royal icing. The fondant isn't completely smooth because the styrofoam layers were pretty nicked up to begin with. Thankfully we're covering it with lots of cutouts!
Then we got started on making our gumpaste roses. It was absolutely critical that we finished them today so that they could dry overnight. I learned that it takes me about 30 minutes just to make one rose, not including the greenery for it and painting later. Ugh! Now I know why these things get expensive! We made a bunch of rosebuds and some loose petals too. After lunch, I busted out about 20 leaves as fillers while my partner colored the rest of our fondant brown in preparation for tomorrow.
I'm really happy with our progress today and I'm looking forward to finishing it up tomorrow! We'll have 3 hours to do it all, which should be ample. And I'm glad we have extra flowers and leaves too.. Just in case!
Anthony Bourdain (author of Kitchen Confidential and host of No Reservations) was at our school today, at a totally inconvenient time for us to go (during class). For some reason (politics?) the school didn't advertise it well and stuck him in the smallest theater on campus. It was at 1pm and the theater was full at 11am, with a huge line around the building. Apparently there was some filming happening for the show. Mr. Bourdain is an alum of the school (1978! haha!) so his name is advertised as "Anthony Bourdain '78"... hmm someday I will be Aubrey M. '10! Haha! I'm not into celebrity chefs so I didn't see what the big fuss was about.
Work was fun! We had a brownie tasting (German Chocolate Brownies!) that was pretty good and I did a lot of work on a new book that the school is putting out for bakers. It's more of an instructional book than a recipe book, so I had a lot of fun doing research for that.
Off to study for our final tomorrow!!!
Monday, September 21, 2009
Another Point in the Book

Today was a "finishing" day. We had the entire morning to work on finishing our in-class projects. Luckily, I only had the gumpaste spray o' flowers to finish up, so I took my time, painted up the last petal on my lily, taped everything up and got it graded! Chef C said my floral taping was so good - I could be a professional florist.
I'll think about it.
The six-petal lily. I colored the gumpaste yellow, and painted red powder on the petals. A delicate monster!

My finished spray o' flowers:

Thin two-colored ribbons with perforated edges. I loved the color contrast!

Hyacinth, hydrangea and stephanotis; ivy leaves. Easy to whip up in a few seconds as "filler" flowers:

Calla Lilies:

Rose:


I also had to whip up a big batch of some buttercream frosting in preparation for our individual cakes later on this week. Easy peasy! Still thinking about what flavoring to add... Suggestions?
Tonight was our last night of piping homework. YES! I am pretty tired of devoting 45+ minutes a night to this and having to carry it carefully to class. Not my best, but took a picture anyway. It's a good example of all the different styles/techniques out there.

My partner and I are all geared up for our team cake! We will do as much as we can tomorrow and finish it up on Wednesday. Hopefully it turns out good enough to be picked and featured in the Grand Buffet on Thursday. That'd be rad! Chef C assigned us a cool-looking retro cake - 4 tiers of fondant, circles n' roses. I hope we have fun . . .
Friday, September 18, 2009
Working With Gumpaste = FUN!!!
 Another super tiring day, and I'm starting to feel the effects in my neck! I could go for a good massage! Looking down all day and doing intricate work is not fun... but the end product I come out with is amazing!
This is the part of my profession that I absolutely love: working with my hands. I think it is incredible that people have figured out ways to recreate natural items (like flowers) out of food. Yes, gumpaste is edible, but I wouldn't eat it! It's a heck of a lot prettier than it tastes.
I was hoping to finish up my gumpaste spray o' flowers this afternoon, but I broke an important petal and we have Monday, so I decided to take my time.
Gumpaste is made similarly like fondant and pastillage. Gum tragacanth is the main ingredient (sap from a tree) which adds stretchability. It dries out and gets hard, so it has to be covered when its not being used. It's not expensive to make or buy - the thing that makes gumpaste flowers so expensive is the time factor! Big name cake places will hire workers whose sole job is to sit in a humidity-controlled room making flowers. Fun? Maybe for one day. Not for me.
I HIGHLY enjoyed making these flowers though! I think it is so amazing and fun. We have to create these flowers for our spray:
- Rosebuds (2)
- Rose (1)
- Ribbons (3 loops, 2 ends)
- Calyx (for each rosebud and rose, the green leafy part)
- Leaves (3 ivy and 5 rose)
- Stephanotis (3)
- Hyacinth (3)
- Hydrangea (3)
- Calla Lily (2)
- Six-Petal Lily (1)
Yesterday I made the rose, rosebuds, ribbons, calyx, and both kinds of lilies. The bigger petalled flowers needed to be made first so that they could dry out sufficiently before coloring. Today I managed to finish all the smaller flowers and the leaves as well, not too bad! The small ones are delicate and take special care to not get squeezed. These are used as "filler" flowers on cakes (stephanotis, hydrangea, and hyacinth).
Chef C gave us a demo this morning on coloration. Coloring with powdered dust can add depth, texture, and definition to make the flowers look as real as possible. The whole aim of these gumpaste flowers is to make them look botanically correct. And if you've ever looked closely at a flower, they are extremely detailed!!!
Once I had all my pieces assembled and dried (hanging them upside down helps the petals to stay up instead of falling - no roses resembling cabbages here!), I headed over to the demo workstation where Chef C had gathered all her coloring supplies. I started with the biggest piece first, the six-petal lily. I'd colored the gumpaste yellow when I rolled it, so now all I had to do was brush some red powder on the petals to create some depth and leave the yellow in the center. It came out looking pretty awesome! I did all the other flowers, had a lunch break, and came back ready to roll . . . some floral tape. Every piece of wire that showed had to be wrapped in floral tape, so I guess my paper-flower making a la Martha Stewart came in handy! It was easy for me, until I got to the six-petal lily.
Each petal was attached to its own wire, so we had to gather the six together and tape them, plus 5 stamen in the middle. I placed the sixth petal in, and it gently touched my knuckle, and broke in two pieces. Argh! Well, I tried to glue it back together, but it was too fragile. While my partner spent a good ten seconds gaping at what had happened (yes, W, it broke. It's still broken.... yes, still broken, lying there on the table. Yup.) I got to work making a replacement petal. It'll dry over the weekend and I'll have to color it and add it back in, but at least it was only one. No big deal!!!
I taped up what else I could (put the leaves together and made a few bunches of small flowers). I think I'll assemble it into some kind of vertical bouquet, although we also have the option of making it look like a cake topper.
Throughout the day, we individually met with Chef C to talk about our cake designs. It felt like I only talked to her for about 20 seconds, explaining what I had and how I could do it. She described it as a "swell idea", so we'll see how it gets executed! The cake is not very big, and it must be buttercream, but we can use any medium learned in class to make our pieces/decorations. I'm excited about my design and am looking forward to making an action plan to get it done!
Happy weekend!
Thursday, September 17, 2009
Hard Days' Work
I don't have time to post a "real" entry today - I have been running around busy all day! Class went well and was soooo fun. We sat around making flowers out of gumpaste and will also do that tomorrow too. I got out of class late and had to head over to work soon after, where I hunted down more recipes and did some formatting work on a healthy cooking book. Fun! Dinnertime, then piping homework, then research time to find some ideas for cakes. Tomorrow we submit a drawing for our individual wedding cake. Next week we will have two days to put one together. I'm kinda nervous but also excited for the design I came up with! I'll be using 4-5 mediums and it will be a lot of work, but hopefully it'll come out great! So today was go-go-go, except for a 30 minute break to watch the season premiere of The Office :)
Here's a shot of one of my flowers from today!

Wednesday, September 16, 2009
Royal Icing Work
Day 7 of our class... whew! Moving along quickly and we are already halfway done!
Today was a finishing day for our four-sided cake. Yesterday I covered the cake in fondant and applied decorations of fondant as well. This morning, Chef C gave us a demo on how to decorate with royal icing. I learned a lot of cool new techniques. I think this class is also teaching me to have patience in a HUGE way! I had to remind myself that I am always under a time constraint, and good enough is good enough. I have to be patient and not let the icing (or whatever it is that's making me frustrated) win! I once had a meltdown over pie crust in front of my fiancé. At the time, I was so frustrated about it. Looking back, it's funny now, and certainly nothing to get upset about. Today, I wasn't about to let some icing get the better of me.
I started off making a batch of royal icing. Basic ingredients are:
-Confectioners' sugar
-Egg whites
-Acid (if you choose)
Super easy and quick to make up. I mixed it for about 10 minutes to get it to stiffen up considerably, then got to work. One required component was a large lace point. This is a piece made of royal icing that stands up off the cake, is intricate, thin, and looks like lace. I chose this cornerpiece design, tracing the design onto a cheapy piece of acetate paper.

Super fun to do, but also scary because these can break very easily! It was secured onto the cake with some more royal icing. As an added bonus (and because I wanted to), I also did this monogram piece, but stuck it on the side of the cake. Fun!

The next component is called a "runout" and these are typically seen on sugar cookies. It gives a nice, glossy and perfect surface. I stenciled the design on, watered down my icing to the right consistency and colored it, then did the runout:

The hardest component for sure was this part, called "extensions". Apparently these are really popular in Australia, but no one here in the USA will pay for the added expense because they don't appreciate it! I think that if executed correctly, it can look very beautiful. The idea is to get the royal icing strings as close together as possible without touching. We only had to do one small section, and this probably took me half an hour, and for every 4 strings I'd get on, one would stay without breaking. Ew.

Another component was stringwork. This part got me pretty frustrated, but I kept my cool. Stringwork is supposed to hang away from the cake, so I stacked it on the crimped border. The strings kept breaking and falling, it was so hard to get them anchored!

The last two components were a piped border (I did pearls, easy!) and 15-20 small lace points. These were easy but killed my hand afterwards! Then I had to carefully attach them to the cake with more royal icing:
 Nice effect, eh?
My piping homework went sooo much faster today! I brought home some cheesecloth to strain my lumpy practice buttercream, and the piping was like a smooth dream! Whew!
Work wasn't too eventful unfortunately. I helped locate some recipes in the database for a healthy foods cookbook. I'm not a fan of computer work, but I AM a fan of having a job!

Tuesday, September 15, 2009
Fondant Fun & My New Job!
I had a long day, but it was really fun for the most part! This morning, Chef C gave a demo on how to finish our four-sided cake fondant project. We were given a list of components that we have to include on the cake. It is pretty much a hodge-podge of techniques, so it doesn't look like a real cake, but it's a great way to practice.First I had to knead my homemade fondant until it was soft and smooth. I was going to use the marbling technique to color it, so I dropped in a bit of blue, purple, and neon green food coloring.

I carefully kneaded it just a little bit because the rolling pin action would help marble the colors even more. Once it was rolled thin and wide enough to cover my cake, I rolled it up on the pin and then rolled it over the styrofoam dummy cake.

These are smeared with shortening to get the fondant to stick. Usually on a real cake, you've pretty much got one shot with getting the fondant on. There's no picking it up and shifting it over if you did it wrong or tore it. Too bad! Mine worked out alright. I then set to work smoothing it out from the top down and then trimmed the bottom off flush to the "cake".

The fun part came next with doing the decorations. We had a bunch of colored pieces of fondant left over from past classes to use, so I tried to pick some that would look complimentary with my colors. We had to do at least three borders, so I did a rope border, an onlay border (the one with the red stars), and a border with a pressed top design. So fun! The pieces are all glued onto the cake using a bit of water.

The pastillage piece in the middle is drying and tomorrow I will connect royal icing in strands from the top to the pastillage piece. Very intricate work!

In the above picture, you will notice some crimping. We had to do this, but I really hate the way it looks. We have a LOT of cool tools available for cake decorating, and these crimpers look like large tweezers with designs on the ends. You just press it into the fondant and squeeze. Whatever!
We also had to do some swag (fun word!) and drapes. The trick to these I found was to roll the fondant thin, otherwise the weight will pull it down! I had to work quickly with these as well because they started to dry out really fast.
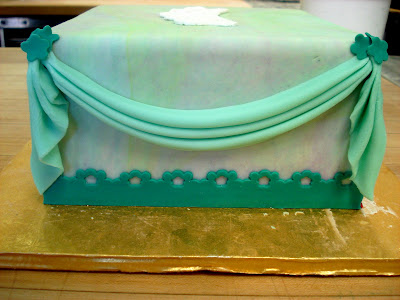

Finally, I had to include an example of pressed/applied design. This was done using a silicone mold. The one I chose looked like lace, and I only used half of the mold and cut out the pieces that I wanted and stuck it in the center of the top of the cake:

Tomorrow we will finish this up after a demo on royal icing. We have more to add to the cake! Whew!
Tonight started our first nightly homework of piping. UGH! Normally, I enjoy this. But my partner had made the buttercream pretty lumpy, and we have to use very small pastry tips, so every 5 seconds I would get a lump! Thankfully my wonderful roommate let me use some of her buttercream for certain parts. I'll post some pictures once it looks acceptable :) We have to do this for five nights. I can't wait for it to be over already!
Today I started my new job! I had the interview yesterday and was offered the job on the spot! I know the department is in need of people, so I was happy to accept and have a job again! It is with the school's publishing department, and I am a publishing assistant. I help the editorial project managers with their projects, doing research and helping out in any way I can. The books the school publishes are ALL about cooking and baking, of course! Five minutes into my day after meeting everyone, I was ushered upstairs for a cookie tasting! One of the chefs is working on a cookie book, so of course there are recipes to test! There were six kinds and we got to taste them all and make notes on evaluation forms. So cool! Wow!
So I guess I will be helping with the new cookie book. I met the chef who's doing it and he seems like a really nice guy. Unfortunately I will never have him because he only teaches for the bachelors students. Today I had to do some data-entry type stuff with different cookie recipes. I got to see how they come up with the recipes for the book and tweak them. It will be really interesting to see the whole publishing process and what projects I'll get to do! The job doesn't pay much at all, and it's only 3 hours a day, but it's money, I'll learn something new, and it'll look great on my resume!
Sleep calls!
Monday, September 14, 2009
Sugar - Part 2
Happy Monday!! This class tends to make me sooo excited; it feels like Christmas every day! I look forward to new challenges and cool projects! I've had some classes here that I've dreaded going to, but this one is super awesome!
I had to finish up my sugar showpiece today, as well as make a batch of rolled fondant, and leave time for Chef C's demos. Argh! So much to work around! Chef C demo'd how to make the rolled fondant first thing, and then showed a sweet slideshow on all the different ways fondant can be used. More later.
I quickly got to work and assessed the situation with the pieces I'd made on Friday. Thankfully, they'd made it through the weekend! Whew! They were a little bit sticky but still useable. I'm so glad that I kept all of them, even if they didn't seem great at the time. Something is better than nothing when you're in a pinch!
However, I had plenty of time to finish things up. I looked at the base I'd made on Friday and decided that it wasn't worth keeping, so I tossed it and started over. The inside is supposed to look like this (known as "straw" sugar):

But we weren't required to break it open for our showpiece. This is done by carefully folding hot sugar back and forth onto itself, creating lots of tunnels. I think I may have pinched and squished mine a bit (the pink piece), so I just left the whole thing intact and used it as a base for all my other pieces.

I alternated two colored logs and set them on the warmer to create the ribbons. These were SO hard! In order to pull the ribbons evenly, the sugars all have to be the same consistency/temperature. This is incredibly difficult, as the warmer doesn't heat evenly, and neither does the microwave! I had to make do and ended up getting more than enough loops and ends to choose from for my piece.
I made another rose to bring the total to four, attached the wings to my swan and was ready to assemble! I had a solid hour to accomplish this before the lunch break, so I took my time. I glued the straw sugar (pink) to the bases Chef C had made for us (a solid disc of sugar). I made up a bubble (green) to fill the space, glued down my swan and set to work getting the rest of the components added on.

Feels like it ended up being a little bit cluttered, but I liked the overall look and the colors came out very Easter-y! Can you see the golden goose that's hiding? :)

The rolled fondant was REALLY easy! Chef C swears that the homemade kind is best, plus you can decide what color to make it and you can better control the consistency. Our recipe and many basic recipes include:
- Confectioners sugar
- Gelatin (acts as a stabilizer)
- Corn syrup (acts as a moisturizer)
- Water (to bloom the gelatin)
- Glycerin (softens to make easy rolling)
- Shortening (acts as a moisturizer)
The process to mix is very easy. The hardest part about fondant is the actual placement on the cake. It is temperamental and picks up marks easily from fingers, jewelry, etc. The whole aim of fondant is to make a cake look flawless, smooth and sometimes shiny. It's pretty much pure sugar, and doesn't taste really good, so it normally gets peeled right off of cakes when it comes time to serve :(
Chef C gave us a demo on how to properly cover a square cake, as well as a round cake. Tomorrow we get to decorate a dummy cake (made of styrofoam) and practice all these cool techniques on it! We move so fast from project to project, it's crazy! Makes the time fly by though :)
Sunday, September 13, 2009
2009 Gluten-Free Summit: East Edition
About six weeks ago, I received an e-mail from one of the chefs on campus asking for volunteers for the Gluten-Free Summit. I quickly replied that I was available that weekend and was assigned a presenter to assist. I had no idea what I would be in for! Also, as an assistant, I was going to be allowed to attend the whole summit for free! Sweet!
Living gluten-free (GF) is so difficult, but necessary for those who have classic Celiac's Disease or have gluten intolerance or sensitivity. We're talking about cutting out ALL wheat products from the diet - super hard! I had never heard of Celiac's until I moved to Hawai'i and met someone with this disease, who is now one of my very good friends. It always bummed me out to have him be excluded from the food I would prepare, and when I became a label-reader, I was astounded to find gluten present in so many products.
This GF Summit has two "editions", one in the East and one held in the West. I think this was the fifth or sixth year of summit action. Basically, speakers from all over the country are brought in to talk about the GF lifestyle (it's more than a diet) and to demo products and foods that are gluten free.
I pretty much had no prior knowledge about GF cooking or baking, except for the time we made pancakes on the fly at our friend's house using rice flour (which I thought was pretty crafty/cool!). As a student in the baking program here, I will only have one class that will focus on GF baking and baking for people with allergies/intolerances. This class is three weeks long, which is waaaay too short, I feel. For me, attending this summit was a huge eye-opener to the possibilities of GF baking and what some people have to go through. This summit also cost almost $400 for people to attend, and I got to go for free! So I took full advantage and attended the entire thing! Wow!
I will just talk about a few highlights and what I learned here:
- GF is an expanding market. This disease can take anywhere from four to 11 years to diagnose, and only about 1% of the US population has it. But it will be rising as doctors learn to diagnose it better. Unfortunately as of now, there is no cure, so the GF lifestyle is not a "fad diet". People have to eat this way to survive and live. More products are being made available now than ever before. One of the sponsors of the summit was Bob's Red Mill. I have seen their products for sale first at health food stores, and now it is available in mainstream supermarkets. Another sponsor was Pamela's Products, and Pamela was there herself! I got to speak with her about her mixes and learn about the versatility that they have when it comes to baking (ps - her chocolate cake mix is AWESOME!).
- I learned about the many different ways to prepare the 11 GF grains. I had no idea how before! We saw a wide variety of foods being demo'd and prepared, from fried chicken to linzer tarts to stirfry and risotto (made with quinoa!). I think this is the biggest barrier for people - they don't know how to prepare it all.
- I learned how one goes about preparing for a demo. The woman I was paired with was a total sweetheart! Margaret Dickenson, and her husband, Larry, came from Ottawa, Canada. She is an author and television show host and is the cutest little thing. Not only was she stylish, but she was incredibly detail-oriented, which I just loved! She had the station measured out and a diagram drawn to show me where everything would go. She went over the details of what I would do and how I would do it. I pretty much had to stand up there with her while she did her thing and keep an eye on the buckwheat and quinoa that was cooking, and hand her anything she needed. It was fun! She'd written out what she was going to say beforehand and was practicing it up until the moment she went out. So organized! She did great too, and had that lovely warm personality that everyone was immediately attracted to. Margaret's focus wasn't just on the cooking either, but on how to entertain in an attractive way - all the different kinds of set-ups and serving dishes that one can use. While I was helping her the day before, she asked me all about what I was learning, where I was from, and what I wanted to do (and Mom and Dad, she asked about what you guys do as well!). After her demo, she gave me a copy of her latest cookbook!!! And not only did she sign it, but she wrote me a little note inside! So awesome! And totally unexpected! She said that she hoped we'd be in contact in the future because she wanted to hear what I was up to. Nice!
And I got a sweet picture with her too, right before her demo began:

- I loved hearing about and seeing all the different types of people who came to the GF Summit. There were a few moms who had 1-3 kids with Celiac's disease - wow! There was also a family who sat in front of me with two girls. One of the girls had the disease, but the whole family chose to live GF in support of the daughter - how awesome! Also present were some industry professionals, others who had never been formally trained, and representatives from some of the GF companies. It was a great mix!
- NETWORKING! I never thought I would walk away from this event with so many contacts! When I absolutely have to, I will go up and talk to people, even if it feels a little awkward or I don't have much to say. Yes, I am interested in GF baking, but I don't have much experience and I don't have the disease myself, so I don't really know what it's like. I met people who knew A LOT more than I do, but it was a great learning experience! On Saturday, I sat next to a woman from North Carolina who had no professional training and had started her own baking company recently. She got her home kitchen healthcode certified and started selling goods at farmers markets, then had a huge demand for GF products, so she did a lot of research and testing. She recently got a contract to wholesale baked goods for a local community college. Wow! I also met a man who sub-contracts himself out to Whole Foods in his area, teaching consumers how to use products on the shelves that are unfamiliar. I met a guy who works for a gourmet to-go company and is studying food science, so I connected with him to get some book recommendations about that subject since I am interested! Of course, I met Margaret too, who sounds more than happy to write me a "letter of comment" (as she put it!). The last person who demo'd was a female pastry chef who was married to a culinary chef (he was the MC). They seemed like a great team! Then my ears perked up when I heard that she was a native of Hawai'i and had worked at the Royal Hawaiian! I thought to myself, "I have to talk to this woman!!!" At the end of her presentation, I went up to her and told her I'd lived there, also went to UH (she went there AND my current school too!) and that I was interested in working in the hotel industry and was looking for contacts. I got her information and we will see what happens! Wow! If something works out for me . . . I mean, I never would have thought that I would make this kind of connection from going to this summit! Wow! (Sorry, can't stop saying wow :)
I left the summit today with happiness in my heart for all that I had learned and inspiration to find out more as well. I couldn't believe how this weekend turned out, better than I had imagined. I also left with a new cookbook and lots of little samples and TONS of recipes! I am excited to learn more and go forward. Woohoo!!!
Saturday, September 12, 2009
Sugar - Part 1
Friday was my Sugar Day... aka Day 1 of working on my sugar project. It was SO much more fun and so much harder than I thought it would be!!!
 We had a brief lecture from Chef C about the process for the seven students doing the sugar pulling. We wrote our names down for who would cook and pull their sugar when, since Chef C wanted to be on hand to work with us individually. I was #3. We also named off some colors we wanted to have so Chef C could mix the appropriate amounts for us (sometimes food coloring contains acid, and we didn't want too much to interfere with our sugar). Next, she told us the equipment and setup we would need.
To get ideal "clean" sugar, there are some prerequisites:
- Clean equipment (we used a copper pot for ultimate heating efficiency, and had to clean it with vinegar and salt).
- Wipe the sides down with a wet brush - any beaded sugar on the sides will fall in and cause crystallization - bad!
- Add a doctor (some kind of doctored sugar, like isomalt).
- Add an acid.
- Don't stir after the sugar comes to a boil.
- Skim the scum.

Beautiful color, right?! I was in love! Marble naturally absorbs heat and redistributes it amongst its mass, so it is a great way to cool things down quickly. Once the sugar stopped spreading, I used a bench scraper (also greased) to scoop it up on top of itself to redistribute the hot and cold parts. The aim was to get the hotter parts onto the marble, rotating everything. Here I am, excited about the process:

The gloves are to help my hands handle the heat. Once it got to be a manageable heat, I would flip it and roll it like a jelly roll to distribute the heat. Finally, the sugar stopped spreading so much and started to tighten up. It was time to do the pulling!
 I have to say that this was the most fun part! Pulling agitates the sugar, causing crystallization and air pockets. This lightens the color of the sugar (even when you don't add color, the sugar will usually look yellow, then very bright gold) and gives a beautiful shine! You must try not to overpull. The shine you achieve at this level will stay with the sugar throughout the rest of its "life" as you use it. Pretty cool! We add a couple of twists and fold, twist and fold, bringing the ends together and pulling gently only with our fingertips to try and get an even pull. It was so much fun and it didn't even hurt my fingers too much! Then it was pulled pretty wide, laid on the marble, and I then cut it into chunks before it got too hard. Finally, I left it on the marble to cool:
This sugar can then be stored and held for a loooong period of time (sugar won't go bad) as mise-en-place. Then whenever you need it, you can just grab it! Pretty handy! Every student did a different color, so we had a lot to choose from. Once it was in this cut up state, it was a free-for-all on what we were allowed to use.
On Monday, we will turn in our finished sugar showpiece completely assembled. I didn't take a picture of any of the pieces yet because I'm not sure they'll make it through the weekend (it's very humid here - aka sticky sugar!) and I may just do some over. I'll described the process more on Monday. We have to include these components in our piece:
- 1 swan
- 2 roses
- 5-6 leaves
- 1 sugar straw
- 5-6 ribbons
Lastly, I attempted the swan. This is done similar to glass-blowing. We use a hand pump attached to a metal pipe. The end of the pipe is heated and attached to a small ball of warm sugar. Gently, I pumped air into the ball and tried to shape it with my hand. The first one was a complete dud - I pumped too hard and busted a hole in the side. The second try was more successful, but the swan ended up having a funny looking... backside as I attempted to remove it while it was still soft. My third try was laughable - it was all good until I tried to remove the swan from the pipe (attached by the tail). I heated the end up and was trying to pull it off gently, when the entire bird literally took flight - flying off the pipe and smashing onto the floor, breaking in many, many pieces. I looked up and saw that I was being watched by a tour through the windows. Great! They laughed, I laughed, and ran to get the broom and try again. My fourth attempt was a great success! A small, beautiful white/gold swan. Yes!
Hopefully everything makes it through the weekend and I will have max time on Monday to perfect and assemble. Ahh!
This is also an exciting weekend. I volunteered to help with the Gluten-Free Summit happening on campus. I got to attend all day for free today and watch six demos and taste delicious food! Tomorrow I am assisting an author/television host from Canada with her demo. She is awesome! I am so excited and soaking up everything I can. Tomorrow I hope to recap everything!
Subscribe to:
Posts (Atom)